Control office lights using SF1 + NodeJS + Arduino
Last friday I gave a talk on our local Salesforce Developers Group named “SF1 and the Internet of Things” (slides).
In that talk I explained how to hook your office lights to an arduino and control that using SF1 from your mobile. In this post I’m going to give the technical details of that project.
Disclaimer: The goal of this post is to explain how to connect SF1 + NodeJS + Arduino, I’ll not be posting schematics or any instructions on how to connect the Relays to the Arduino. Be careful when doing it, since you’ll be dealing with electricity! I’ve used LEDs in my presentation and in this post to avoid any hazard, but the system will work with relays instead of LEDs.
Setting up the environment to control
The entire project will be something like this:
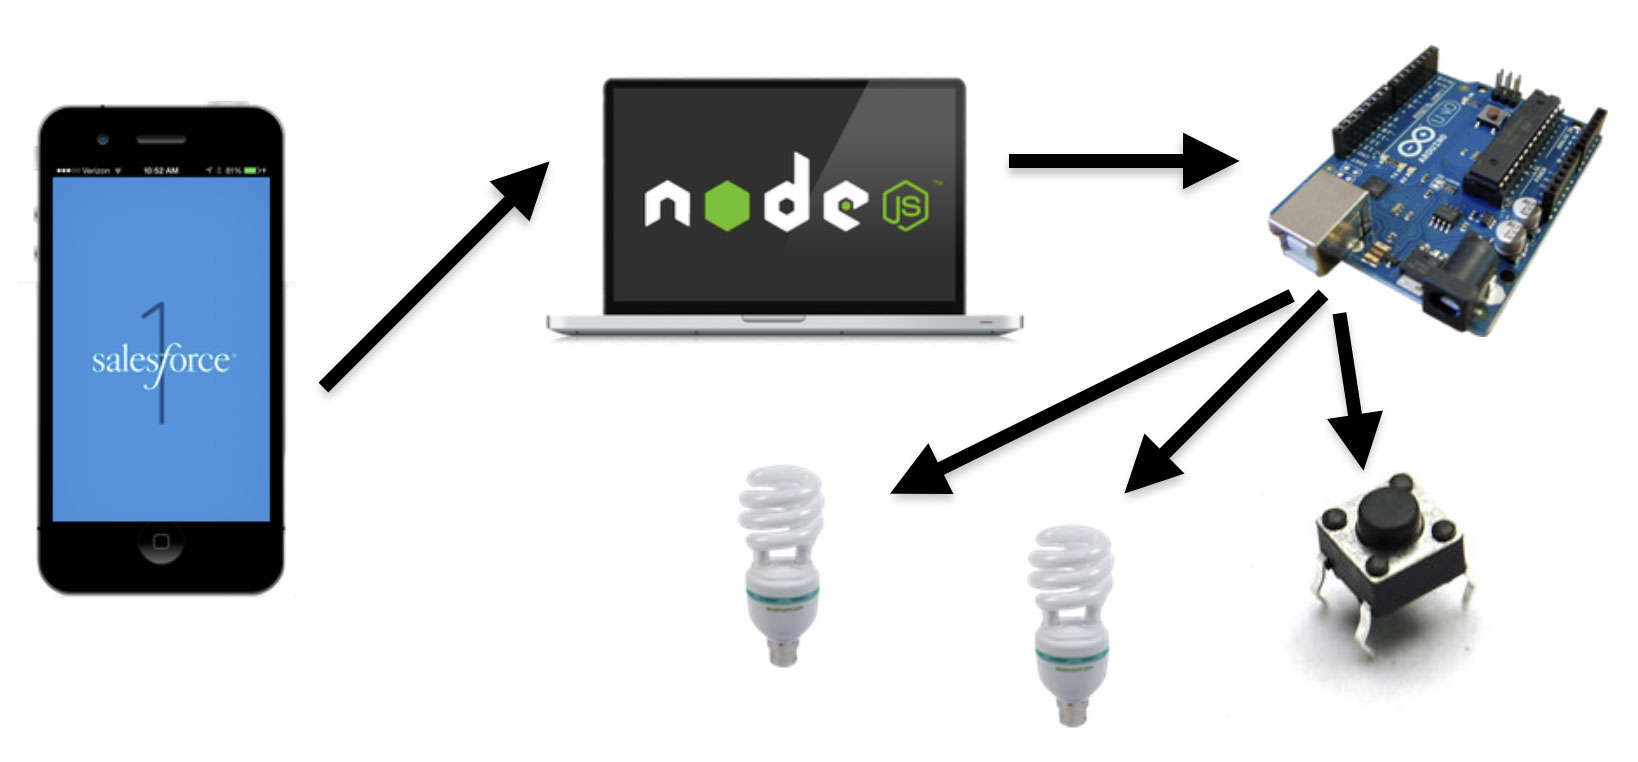
First, let’s set up the environment we want to control using the phone.
Arduino, relays and NodeJS
To control the lights we are going to use an Arduino UNO board. Arduino boards contain a microcontroller that can run C++ code.
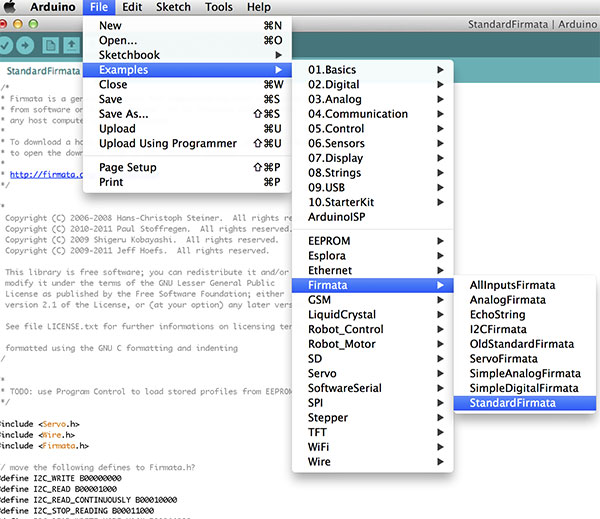
We’re going to use NodeJS to control an Arduino through the USB port of the board using a library called Johnny Five. That library interacts with the Arduino using the Firmata protocol, wich must be loaded to the microcontroller.
Standard Firmata comes as an example in the Arduino IDE:
Besides that we will need relays, to control the power given to the lights.
MORE WARNINGS: Be extra careful when connecting anything with relays, research about schematics on how to connect your Arduino and your Relay. There are different relays that allow different AMPs and Voltages.

In summary, where are going to tell the Arduino to turn ON or OFF a given pin, and that will trigger the relay to turn on or off the lights.

As In my talk, the rest of this post is using LEDs.
Finally, we will need a server to control the Arduino (and give the “Internet” part of IoT to our board).
This can be a laptop, an old computer or a raspberry pi, as long as it has an internet connection, a USB port and can run a NodeJS interpreter.
Salesforce configuration
Let’s start with the setup on Salesforce.
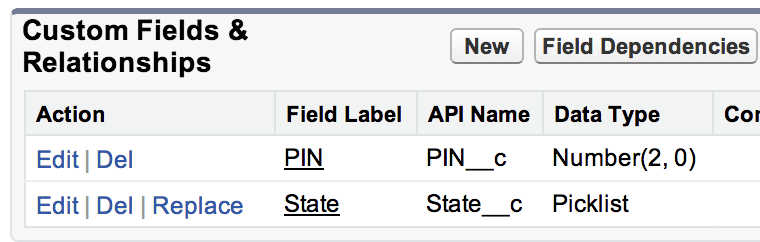
This is pretty straigthforward, we’re going to create an object called “Light”, with 2 fields: State and PIN.
To do so we need to head to Setup/Create/Objects click “New Custom Object”, and then add the 2 custom fields.
After that we need to create “Light” records using the pin of the relay connected to the Arduino, and the initial state. Give the records names of the places that the lights will be located, for example “Lobby”.
Next we will create a Streaming API PushTopic:
  PushTopic pushTopic = new PushTopic();
  pushTopic.Name = "LightStateChanges";
  pushTopic.Query = "SELECT Id, Name, State__c, PIN__c FROM Light__c";
  pushTopic.ApiVersion = 30.0;
  pushTopic.NotifyForOperationCreate = true;
  pushTopic.NotifyForOperationUpdate = true;
  pushTopic.NotifyForFields = "Referenced";
  insert pushTopic;
So when we subscribe to this PushTopic, if a Light object is created or modified, we will receive a notification.
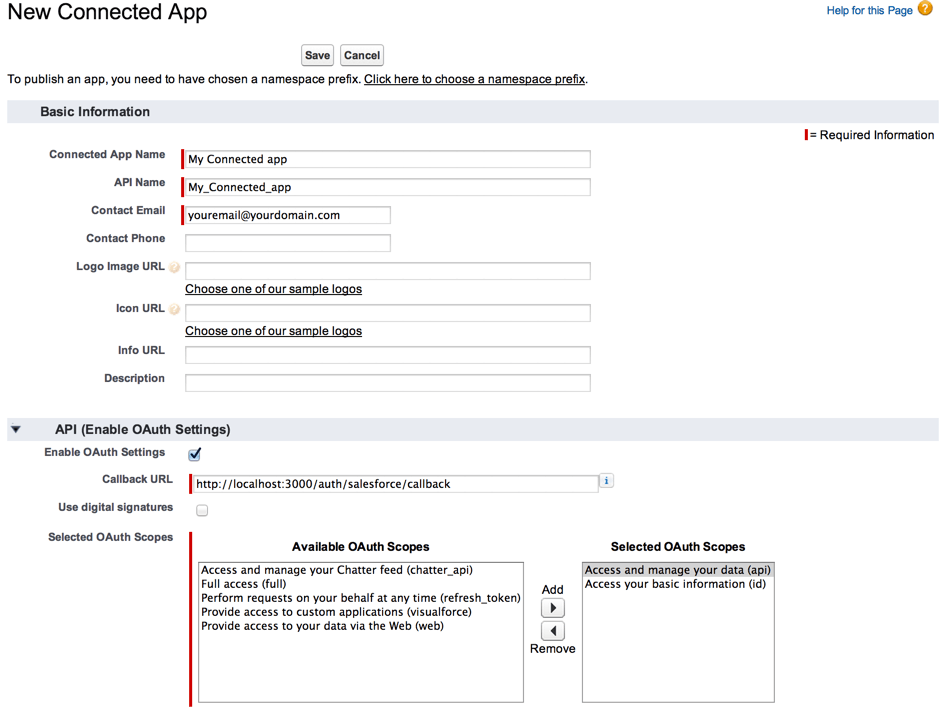
Create a connected app from Setup/Create/Apps:
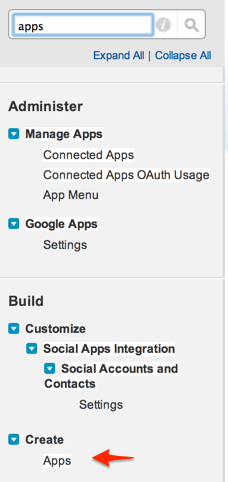
At the bottom of the screen there’s a section called Connected apps click on New:

Fill the required fields with information about your app, and check “Enable OAuth Settings”:
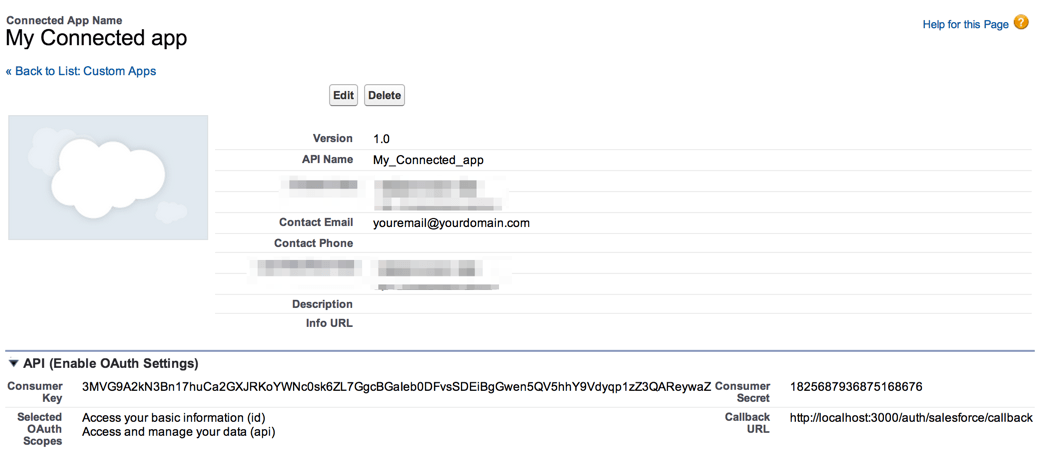
After the app is created take note of the “Consumer Key” and “Consumer Secret”. The terminology is from OAuth 1.0 those now are called “Client Id” and “Client Secret”.
Create a user called “Office Robot” and grant access to the connected app for his profile editing it and checking the app name under the section “Connected App Access”.
NodeJS on the server
On the server (I’ll assume a *nix configuration) in this case I’ll be using OSX.
We need NodeJS and the package manager to install the libraries NPM.
The packages we need to this project are 2:
- Johnny Five https://github.com/rwaldron/johnny-five
- NForce https://github.com/kevinohara80/nforce
Johnny Five as I mentioned before is used to control the Arduino, and NForce to interact with SF.
We can install them running:
$ npm install johnny-five nforceThen we’re going to create a file called app.js that will have basically the following structure (see the comments for explanation of every section):
// library requires
var five = require('johnny-five')
var nforce = require('nforce');

// board instance of jhonny-five
board = new five.Board();

// add these as env variables
var client_id ='<your_client_id>';
var client_secret ='<your_client_secret>';

var org = nforce.createConnection({
  clientId: client_id,
  clientSecret: client_secret,
  redirectUri: 'http://localhost:3000/oauth/_callback',
  mode: 'multi' // optional, 'single' or 'multi' user mode, multi default
});

// When the Arduino board is ready and connected
board.on("ready", function(){
  // nforce Authentication
  org.authenticate({ username: '<officerobotuser>', password: '<officerobotuser>' },
    function(err, oauth) {
      if(err) return console.log(err);

      // subscribe to a pushtopic
      var str = org.stream({ topic: 'LightStateChanges', oauth: oauth });
      str.on('connect', function(){  console.log('connected to pushtopic'); });
      str.on('error', function(error) { console.log('error: ' + error); });

      // control lights
      str.on('data', function(data) {
        switch (data.sobject.State__c) {
          case 'ON':
            five.Led(data.sobject.PIN__c).on();
            break;
          case 'OFF':
            five.Led(data.sobject.PIN__c).off();
            break;
        }
      });
  });
});
The code is pretty straightforward, the components are in sequence:
- Library loading
- Initialization of the board
- Creation of SF connection
- When board ready, authenticate in SF
- When the authentication is completed, subscribe to the pushtopic
- When data is received, using PIN__c set the light on() or off() (in this case leds)
Action!
Now connect the Arduino plugged to the USB port, with the right pins hooked to the relay (or leds in this example).
Execute the NodeJS app:
$ node app.jsLogin to your org using SF1 and go to the lights object:
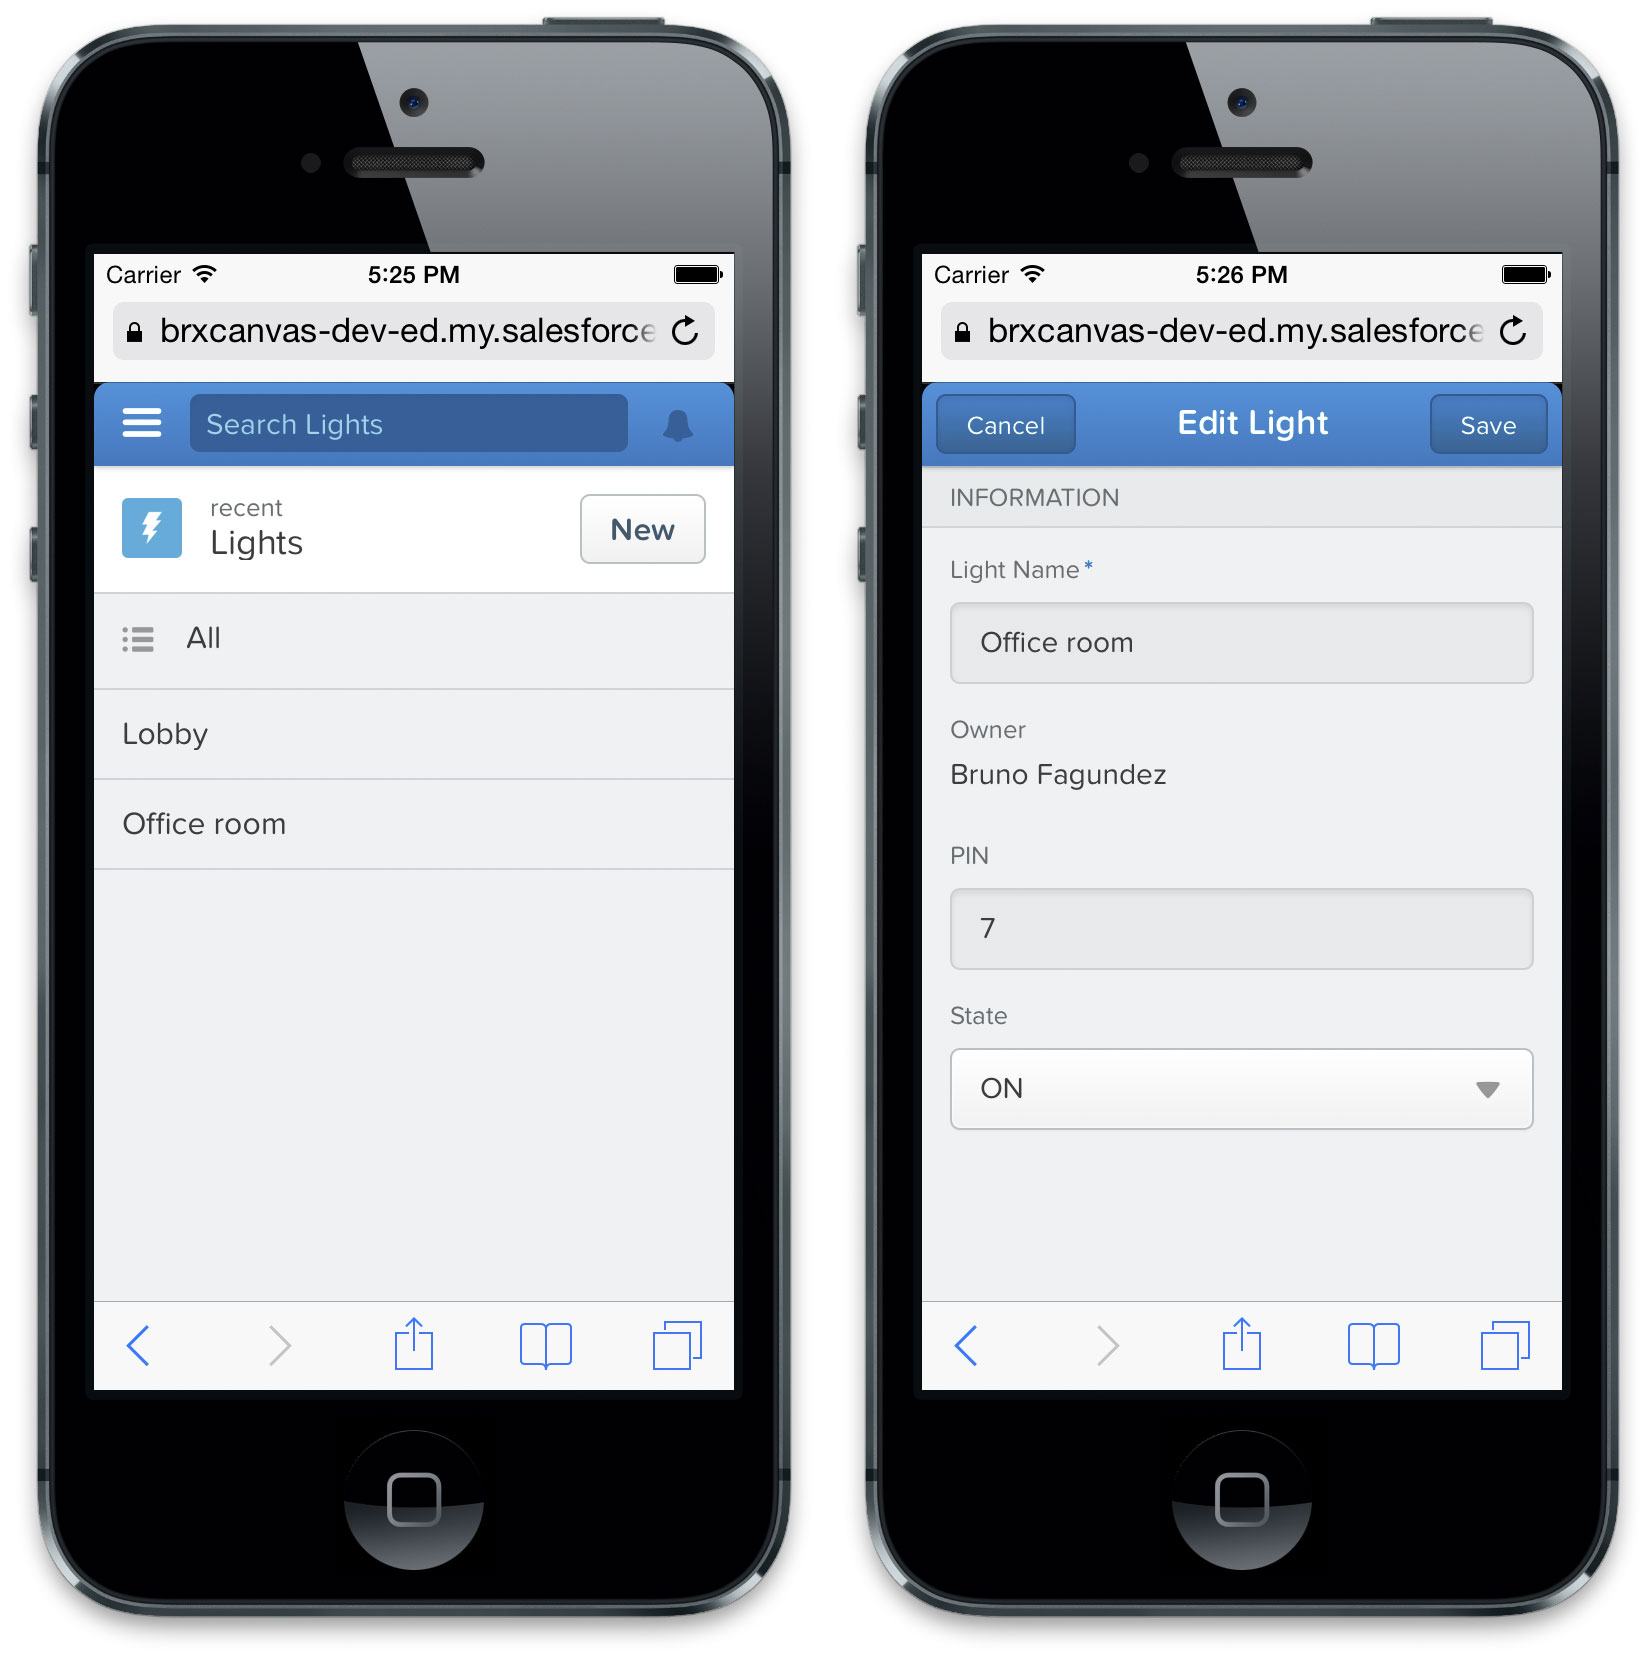
And when the Light records State is changed, we’ll be able to see the lights going ON or OFF!
BONUS: Chatter commands!
Turning lights is fun using your mobile and SF1 gorgeous UI but what if you could do that posting “commands” to chatter?
It is pretty easy actually, just create a trigger on the FeedItem object:
trigger turnlightsOn on FeedItem (after insert) {

    for (FeedItem f: trigger.new)
    {
        if (f.Body.contains("!lightsON"))
        {
            List<Light__c> officeLights = [select Id, State__c from Light__c];
            for(Light__c l:officeLights){
                l.State__c = "ON";
            }

            update officeLights;
        }


        if (f.Body.contains("!lightsOFF"))
        {
            List<Light__c> officeLights = [select Id, State__c from Light__c];
            for(Light__c l:officeLights){
                l.State__c = "OFF";
            }

            update officeLights;
        }

    }
}
And that’s it! every time we post “!lightsON” all lights will go on, and “!lightsOFF” will do the opposite.
FINAL WARNING: Do not connect electronics/lamps that require more amps than the relay is rated for! This is a basic guide to demonstrate how to connect SF1 to NodeJS and interact with the Arduino, do more research before connecting ANYTHING to your Arduino board
I’m not responsible for any damage!
Comments